![]()

|
|
|
|
|
|
|
Air Box Modification
Began: November 20, 2001
Objective: To fix the restrictive nature of the stock air box without having to make a totally new air box.
Warning: This mod may not be for everyone, it will remove the heated air inlet system from your air box. This mod is a permanent modification to your air box, it can not be reversed.
Tools and Parts Needed: A dremel tool and assorted cutting and buffering bits, sandpaper, shop knife, pliers, cutters, silicon sealer, shop glue, a Phillips screw driver or Torex bits (depending on your air box), a vacuum cap (you can make this out of a part you remove from the air box plus some silicon sealer), and a breather filter (preferably K&N and while you're at it get a K&N stock replacement air filter for your car) for the crankcase vent.
Time: From beginning to end 1 to 4 hours (depending on how much effort you want to put into porting the inside of the air box).
The Project: After making the first design of my ram air project I did some tests on the stock air box and discovered it restricts 78.3% of air flow. I think Chrysler designed it to be so restrictive to act as a sound baffle (less air flow = less noise inside of the car) and also to allow the heated air inlet system to heat up the air going into your intake. We want more power, so hot air isn't good and I enjoy the sound of air being sucked into the throttle body. Please note that this mod will slow down the amount of time it takes for your vehicle to heat up.
There are three things you need to change on the stock air box.
1). In the stock intake (label 1 on the picture below) there will be a small plastic butterfly door that is controller by vacuum and a temperature sensor. This is part of the heated air inlet system, which is all going to be removed. To remove the plastic door, turn the air box upside down (like in the picture) you will see a bunch of screws holding the plastic lower part of the air box to the metal upper part. Remove all the screws and separate the to halves, remove the plastic door (1) by prying it from inside of the air box lower half. Once it is out, remove the spring and everything that connects the plastic door to the vacuum line. The smaller heated air inlet (the inlet my fingers are on in the picture below) needs to be plugged. I cut up the plastic door and sealed it into the heated air inlet. I took the heard air hose (the hose that connects to this inlet and placed it facing down towards the road, I didn't want any of the hot air coming out of it near my new air box.
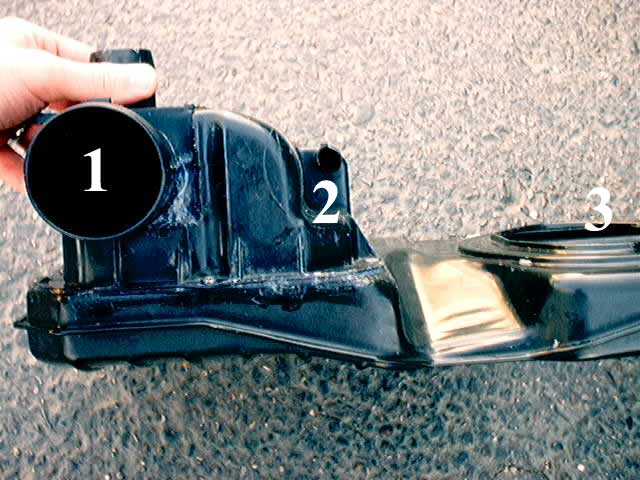
2). The stock crankcase vent to air cleaner hose connects here (label 2 on the picture above). This crankcase vent brings in oily warm air into the intake, and it really messed with airflow, so I plugged it off entirely (warning - if you do this you will need to put a filter on the crankcase vent and stick it somewhere under your hood to allow it to breath, see my Crankcase Vent Mod). A couple pieces of plastic to plug the hole and a ton of silicon sealer and shop glue did the trick. Clean it off and test it by blowing into it after it dries.
3). The air temperature sensor (label 3 on the picture above) is a vacuum powered device located inside of the air box. It controls the plastic butterfly door in the intake (label 1) by a vacuum diaphragm and a thermostatic spring (the part we removed in part 1). Since all the things it controlled have been removed, this needs to go also. If you look at the picture below you can see where it use to be (the two holes with silicon seal around them), just pull out the sensor and the vacuum line attached to it (only the one on the air box). You will need to seal up the holes left from removing the sensor, a straight piece of plastic glued to the air box and then sealed with silicon sealer and shop glue works good. There will be four holes total you will need to seal (two for the sensor, and one for a clip that holds the vacuum line, barely visible in the picture below on the inside of the air box lower right corner, and one for the hole where the vacuum line use to go into the plastic lower part of the air box). The vacuum line that connects to the air temperature sensor from the vacuum system needs to be plugged with a vacuum plug cap (or fashion your own out of the connector piece that was on the sensor with a little silicon sealer).
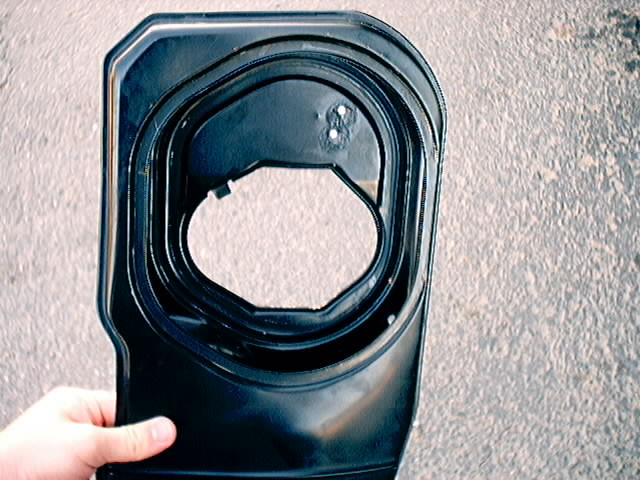
Once you finish the three things you need to change on the air box it is time to remove and smooth. Start by removing any extra plastic inside of the plastic lower part of the air box (that you removed for step one). I used a dremel tool and a cutting wheel. Then I took some sand paper and smoothed out all the edges inside of the plastic lower part. A small knife works good at smoothing out the corner parts. A smooth large lower half is what you are shooting for, the smooth and bigger it is, the less restrictive it will be. When you are satisfied with porting it, place the lower plastic half on top of the upper metal half of the air box. These two halves need to be sealed together because a lot of air is lost between the two of them if not sealed. Silicon sealer works good, use it liberally all over the two mating surfaces, even in the screw holes, once you are satisfied with your sealing job, place the screws back in their holes and tighten it down good.
When you're done it should look similar to the above picture. It now restricts air by only 4.78% (compared to the 78.3% I tested the stock air box at), that is a 338.8% increase in air flow (a little bit over 16 times more air is allowed to come in now). I noticed an increase in power and a good decrease in intake temperature (40 degrees, that alone should be good for 2 horsepower on a stock engine), especially when coupled with a K&N drop in stock replacement air filter (this should be your first mod that you do on your car, good for a few horsepower) and my ram air.
![]()
Copyright © 2004 Karlsnet.com. All Rights Reserved.
[an error occurred while processing this directive]